I finished my Christmas Aprons today. (I posted about them here recently) They're little extras for the Little Tornado's Nan and Great Nan.
I adapted the pattern a little and added the embroidery to personalise. My first attempt at these, so hopefully they'll go down well! More about it over on my blog
Happy Christmas and a happy, healthy & prosperous 2011 to Tilly and all at The Crafty Christmas Club.
Miss P xxx
Showing posts with label women. Show all posts
Christmas Aprons - Done!
Presents for the parents
I gave my parents their presents when they visited this weekend so now I can share them with you all without fear that they might discover and the surprise being ruined.
The Ctr-Alt-Del pillows were for my father. They can go on the sofabed in his office and he can use them when he takes his nap.
I made them out of recycled jumpers and I think they turned out pretty good. He sure seemed to like them.

Another present for my father was this small bowl he can use for a bit of a snack when he is watching a film. I did the drawing myself and glued it to the bottom of the glass bowl from the outside. I then varnished the bottom for a nice finish.

My mother received these recycled spoon garden markers. I have earlier talked about how I made them in this tutorial over on Grey Duckling.

Finally, for my mother too I made this scarf using the very simple but effective basketweaving stitch that I have previously talked about on 'Roued is...' I made one of these for my father for his birthday and when my mother saw it she asked for one too!

Eddie from Grey Duckling
The Ctr-Alt-Del pillows were for my father. They can go on the sofabed in his office and he can use them when he takes his nap.
I made them out of recycled jumpers and I think they turned out pretty good. He sure seemed to like them.
Another present for my father was this small bowl he can use for a bit of a snack when he is watching a film. I did the drawing myself and glued it to the bottom of the glass bowl from the outside. I then varnished the bottom for a nice finish.
My mother received these recycled spoon garden markers. I have earlier talked about how I made them in this tutorial over on Grey Duckling.
Finally, for my mother too I made this scarf using the very simple but effective basketweaving stitch that I have previously talked about on 'Roued is...' I made one of these for my father for his birthday and when my mother saw it she asked for one too!
Eddie from Grey Duckling
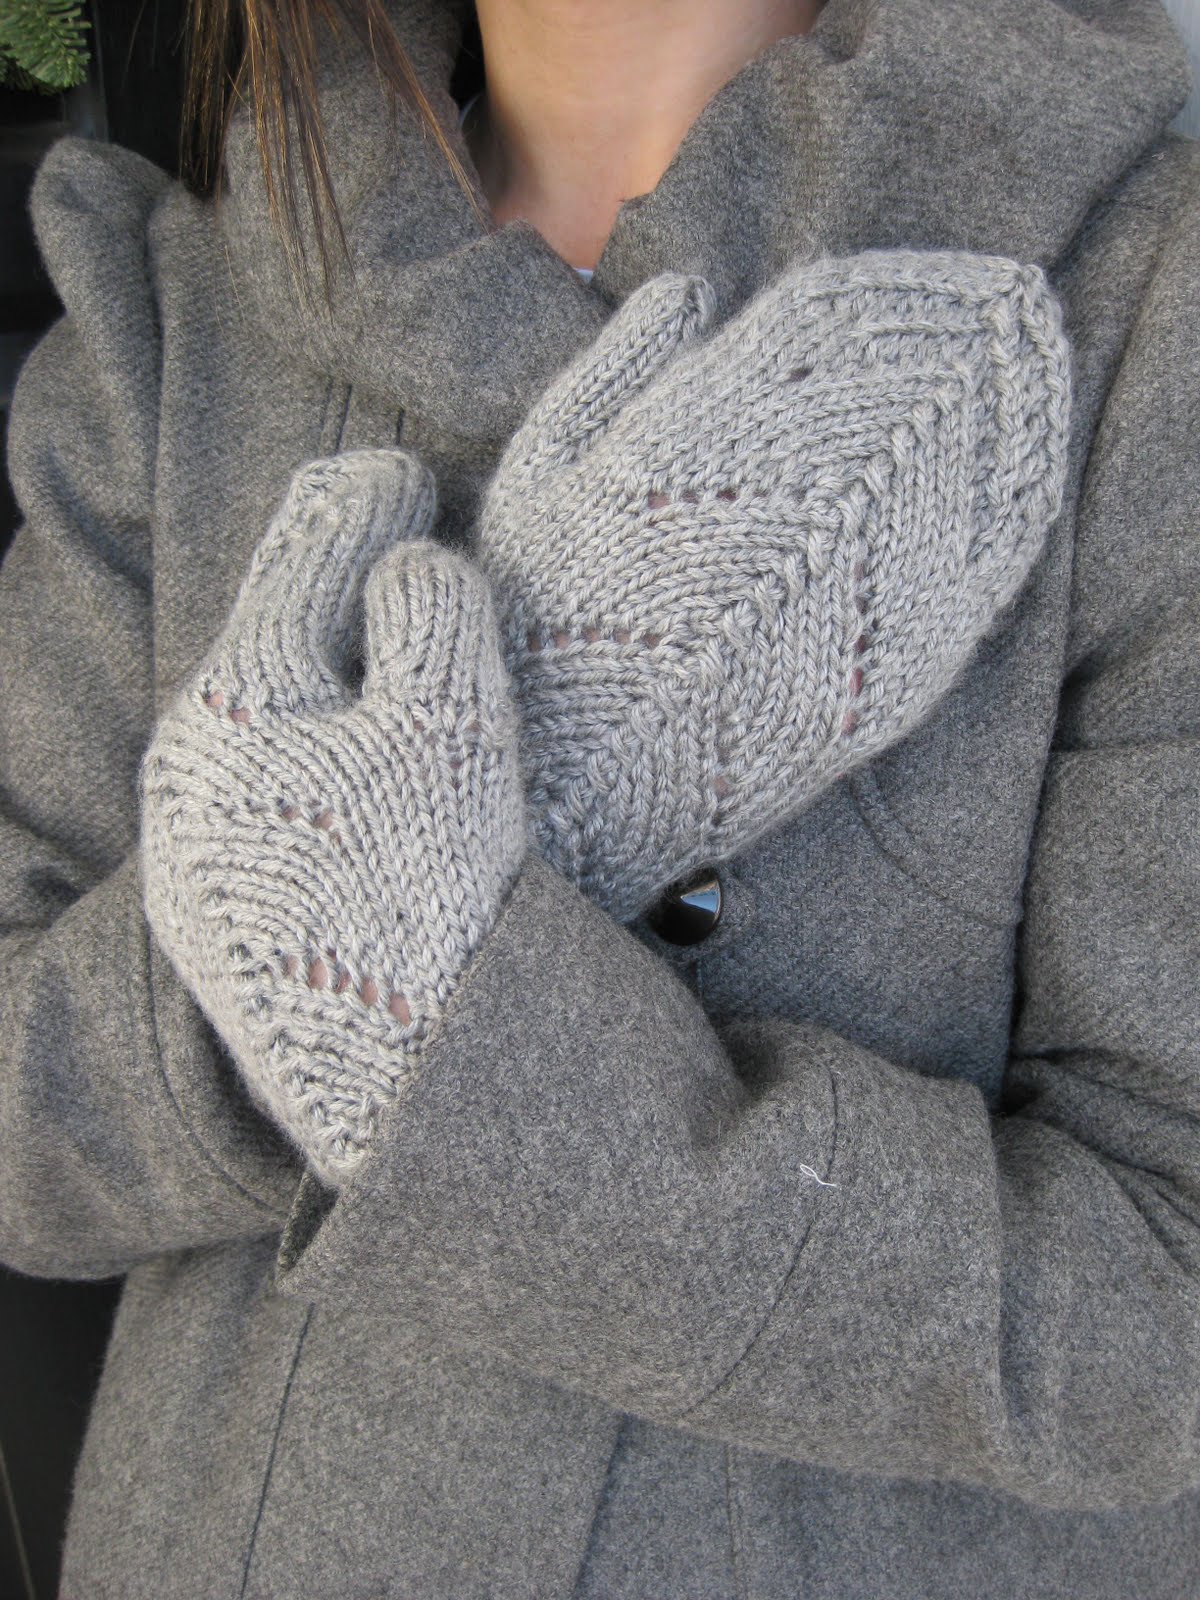
Mittens For My Mom

My mom asked me for a set of these a year ago...better late than never? At least by now she's forgotten all about it, and now they can be a surprise!
I used this free pattern on Ravelry, and they worked up more quickly than I expected. Yay!
I liked the pattern overall, but I added five or six rows to the thumbs. Maybe I have unusually long digits, but the thumbs as directed by the pattern seemed REALLY short.
Oh, well. Long or short, my mom will have warm digits this winter.
Labels:
accessories,
knitting,
women
Christmas Aprons......
Further progress on my Simplicity 2512 will have to be stalled while I knuckle down to sewing up a couple of little cuties for J's Mum & Nan for Christmas. From my stash I've dug out a lovely chambray for the main fabric and a Cath Kidson floral (which began life as a duvet cover!) for the contrast.
The pattern is Butterick, a collection of 1950's style pinnies that I bought about 2 years ago as a beginner project but never used. The final aprons will be a "fusion" of the styles on the envelope. A half apron, with a wide shaped waistband and ties, with 2 patch pockets, one floral and the other cut from the chambray but emroidered with each of their names.
I didn't like the shape of the waistband piece, so did a little re-shaping of my own. It's testament to what a bit of practice and training can do for your sewing confidence. When I bought this pattern I was too scared to even cut it out, let alone start adapting the design and reshaping the pattern pieces. Hopefully finish these tomorrow....
The pattern is Butterick, a collection of 1950's style pinnies that I bought about 2 years ago as a beginner project but never used. The final aprons will be a "fusion" of the styles on the envelope. A half apron, with a wide shaped waistband and ties, with 2 patch pockets, one floral and the other cut from the chambray but emroidered with each of their names.
I didn't like the shape of the waistband piece, so did a little re-shaping of my own. It's testament to what a bit of practice and training can do for your sewing confidence. When I bought this pattern I was too scared to even cut it out, let alone start adapting the design and reshaping the pattern pieces. Hopefully finish these tomorrow....
Labels:
accessories,
apron,
Christmas,
christmas gift,
Clothes,
clothing,
dressmaking,
gift,
gifts,
homemade,
knitting clothing women,
pinnies,
recycle,
tutorial,
tutorials,
vintage,
women
Buttercup bag
I made this handbag for my sister in law today. She loves Cath Kidston so hopefully this fabric (by Tanya Whelan) will be up her street! I used Rae's Buttercup Bag pattern, which is so easy if anyone is thinking of whipping up something similar. I'm not sure if you can see in the photo but the front is pleated, which looks fairly impressive for something that's really simple to make.
I used a coral slub weave for the lining (I know it looks fluorescent pink in the photo, but it's coral, honest!) and added fabric covered buttons to join the strap to the sides.
The bag is really very small - only 10" across - so I'm going to make a couple more of these as make up bags, with a zip at the top and no strap.
Love from Tilly x
Labels:
accessories,
bags,
buttercup bag,
sewing,
women
Oh Knickers!
I'll be honest, I attempted to make a pair of knickers from a pattern I had made in tutorial #1. They weren't great. I thought they were so hateful, they went straight in the bin! The fabric was all wrong, it didn't compliment the lace, and I hadn't thought through what I needed to do before I dived in.
I did stick with it to the end though, and learnt some handy lessons for this attempt! I used different fabric, different lace and all in all I'm happy with myfirst second attempt. Plus, I can only improve with practice and I definately intend to make more! It's a fun, quick and satisfying project. Once I'd tweaked it a little.....and with the right fabric and lace would make a cute little Christmas gift. Perhaps with a matching camisole..... Tutorial here.....
I did stick with it to the end though, and learnt some handy lessons for this attempt! I used different fabric, different lace and all in all I'm happy with my
A few things started...
I just wanted to update in regards to my giant list....!
Just a heads up with the free bag pattern from Burda: you need to go to verypurpleperson's blog for the instructions. Maybe you guys don't need the instructions but I was a little stumped when I tried it without them!
But they're all done:
And I've finished my prototype make-up case:
Which I gave away as a birthday pressie for my sister in law....
And I've started on my piggy mobile:
If you want the pattern for the piggy mobile (I actually didn't use it but got the inspiration from Welsh Pixie's version) it's in the book Tone Finnanger's book Sew Pretty Christmas Homestyle which I have just bought from Amazon :)
Happy crafting!
Just a heads up with the free bag pattern from Burda: you need to go to verypurpleperson's blog for the instructions. Maybe you guys don't need the instructions but I was a little stumped when I tried it without them!
But they're all done:
And I've finished my prototype make-up case:
Which I gave away as a birthday pressie for my sister in law....
And I've started on my piggy mobile:
If you want the pattern for the piggy mobile (I actually didn't use it but got the inspiration from Welsh Pixie's version) it's in the book Tone Finnanger's book Sew Pretty Christmas Homestyle which I have just bought from Amazon :)
Happy crafting!
Snuggly snoods!
Hello again! As I said in an earlier post, I am officially in LOVE with snoods this year. I've crocheted two so far and am working on my third which will be a Christmas gift. They are really quick to make so I may make a few for different people. Everyone wants to snuggle up warm, surely! I didn't follow any pattern, just played about and this was the outcome.
I am re-creating the one I'm wearing in the photograph above as a Christmas gift as I love mine so much. I can't decide whether to decorate it with a bow, or with cherries or with crocheted flowers...or something else?
If anyone's interested in how I made the snoods I've just put a tutorial on my blog. They are easy peasy!
Labels:
accessories,
Christmas,
crochet,
women
Hello!
Hello you all, Thank you very much for welcoming me here.
I am not much of a crafter, but I like to make my gifts. And I usually make the same for everyone, or try to...
Last year, I made all the women in the family a faux fur muff, using Laupre's excellent tutorial but because the fur I used was quite expensive, I lined it with polyester fluffy stuff. It made it warmer and soft and quite regressive to hold.
It was most appreciated by my grandmother who's is 96 and who's hands are always cold.
This week I start on this year's gift, I still need a few supplies, I'll keep you posted.
Labels:
accessories,
women
The Christmas Dress
With my overlocker at the fix-it shop (as per my last post), a few of my sewing projects have been on hold. So what did I do? Start a new one, of course!

Everyone needs a new dress to wear on Christmas day, right? This is BurdaStyle's Danielle dress (without sleeves) and some fabric I bought in Copenhagen.

It's still in its early stages and I've done everything I can do until my overlocker comes home, but I think it's shaping up alright.
Everyone needs a new dress to wear on Christmas day, right? This is BurdaStyle's Danielle dress (without sleeves) and some fabric I bought in Copenhagen.
It's still in its early stages and I've done everything I can do until my overlocker comes home, but I think it's shaping up alright.
Hello, Tilly here, long time no post, but yesterday some friends came over for Craft Club, so I have some craft to show you!
Here is a lovely (if I do say so myself) felt rose brooch I made using Marie's wonderful tutorial.
I sewed a brooch back onto a circle of felt to attach to the back (excuse the slapdash stitching).
Hélène made a pink one to go with her lovely top. Very easy, very satisfying, highly recommended! I think I'm going to make quite a few of these for all the ladies in my family...
And finally, a two minute project made from buttons threaded onto organza ribbon. I think I'll keep this one!
Mini Bloomers
I've had this Collette pattern for mini-bloomers for a while (download it free here), thinking that I would make some in a silly pink sometime for myself. Then last week I realised that they would make great gifts for three close friends of mine. So! I bought some gingham in pink and purple and started to sew.
Unfortunately this is as far as I got when my overlocker decided to stop working (I have rethreaded it over and over and over but it still won't make a chain) so I have to wait until I can get to the sewing machine repair shop before I can go any further.
I think they will turn out pretty cute though. I will definitely post updates. I'm sure, if you weren't interrupted by a dodgy overlocker, that they would be very quick to make!
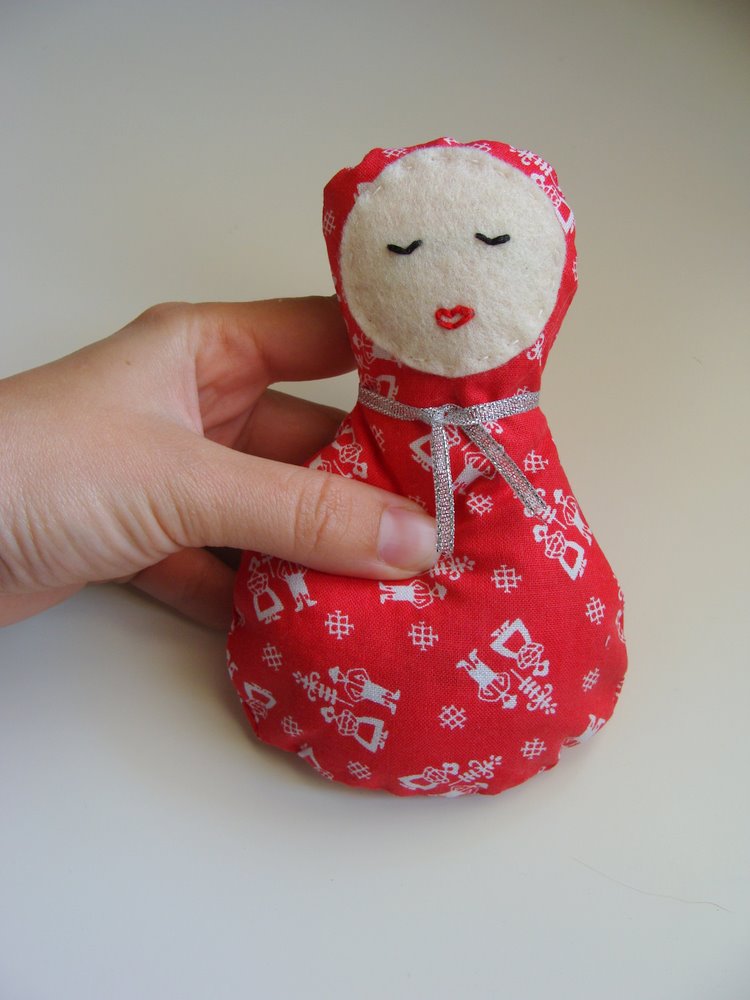
Lavender ladies tutorial
Wow, look at all these great handmade gifts already! I thought I would share with you a simple, quick gift to make.

These sweet little lavender ladies are a modern take on the old fashioned lavender bags that go into your underwear drawer or under your pillow. They make perfect gifts for friends, teachers, colleagues or ‘secret santa’ (Kris Kringle) gifts.
To make a lavender lady, you will need:
Fabric of your choice (approx 2 x 20cm square)
Felt to make the face
Embroidery thread
Needle for embroidery
Sewing machine or needle and thread
Pins
Dried lavender (you will find it in craft shops or health food shops)
Stuffing


To begin, fold your fabric over with the wrong side showing. You don’t need a pattern, just draw two overlapping circles straight onto the fabric (use chalk or pencil though, I used a marker so that you could see it in the photo). For my lavender lady the big circle’s diameter is 12cm and the smaller circle’s diameter is 8cm. It doesn’t need to be perfect though! Cut out your little lady and put aside.

Next, cut out a little round face from the felt. Again, just draw the circle straight onto the felt and cut it out. Mine is 4.5cm in diameter. Stitch on some little eyes and a mouth using embroidery thread. If you are making a few lavender ladies, try stitching different expressions on them.

Stitch the face straight onto the head of the body.

Now, lie the two body pieces right sides together and pin them securely. See those two pins at the bottom? They are very important! This is the gap you are going to leave so that you can stuff the body. Stitch the two body pieces together using a sewing machine or hand sewing. Don’t stitch across the gap.


Turn your lavender lady inside out. Looking cute, isn’t she? Start to stuff your lavender lady, alternating between stuffing and spoonfuls of lavender. All up, I put about 5 tablespoons of lavender in mine.

Once she is all stuffed, hand sew the opening at the bottom together.

And there you have it – a very sweet little lavender lady. I tied a little ribbon around her neck to make her look a bit more festive.
These sweet little lavender ladies are a modern take on the old fashioned lavender bags that go into your underwear drawer or under your pillow. They make perfect gifts for friends, teachers, colleagues or ‘secret santa’ (Kris Kringle) gifts.
To make a lavender lady, you will need:
Fabric of your choice (approx 2 x 20cm square)
Felt to make the face
Embroidery thread
Needle for embroidery
Sewing machine or needle and thread
Pins
Dried lavender (you will find it in craft shops or health food shops)
Stuffing
To begin, fold your fabric over with the wrong side showing. You don’t need a pattern, just draw two overlapping circles straight onto the fabric (use chalk or pencil though, I used a marker so that you could see it in the photo). For my lavender lady the big circle’s diameter is 12cm and the smaller circle’s diameter is 8cm. It doesn’t need to be perfect though! Cut out your little lady and put aside.
Next, cut out a little round face from the felt. Again, just draw the circle straight onto the felt and cut it out. Mine is 4.5cm in diameter. Stitch on some little eyes and a mouth using embroidery thread. If you are making a few lavender ladies, try stitching different expressions on them.
Stitch the face straight onto the head of the body.
Now, lie the two body pieces right sides together and pin them securely. See those two pins at the bottom? They are very important! This is the gap you are going to leave so that you can stuff the body. Stitch the two body pieces together using a sewing machine or hand sewing. Don’t stitch across the gap.
Turn your lavender lady inside out. Looking cute, isn’t she? Start to stuff your lavender lady, alternating between stuffing and spoonfuls of lavender. All up, I put about 5 tablespoons of lavender in mine.
Once she is all stuffed, hand sew the opening at the bottom together.
And there you have it – a very sweet little lavender lady. I tied a little ribbon around her neck to make her look a bit more festive.
Subscribe to:
Posts (Atom)