Showing posts with label christmas gift. Show all posts

Christmas Wrapping Ideas & Quick Tutorial

As per my last post, I've been playing about with making pleated paper bands with which to embellish our gifts this year. I'm rather pleased with the result and have kept it simple by just adding a narrow ribbon and neat bow to finish.

If you like the idea, it's really easy. To make the band I measured out some guidelines on the back of a length of contrasting wrapping paper. But you can do it by eye as well. (I'm rubbish at that though!)

I spaced them about an inch apart and used the edge of my metre rule to fold them smooth along the edge. Folding one way, then the other, to create a concertina effect.

I then pressed the band under a pressing cloth using a warm, dry iron. Just to sharpen the folds really, and  keep it nice and flat.

I wrapped it pretty snug around my gift, (don't want it sliding off or moving about) trimming of the excess and securing it at the back with sticky tape.

I added a very simple bow in a contrasting colour to finish. I'm alternating the green and turquoise ribbons on different gifts to tie in with the main wrapping paper.

To make these bands for EVERY gift would be too time consuming for my liking (and for the time I have left!) so I've compromised by alternating between plain (see right) and pleated bands on different gifts.


Now I know what I'm doing, should have it all finished by tomorrow!

Wrapping is underway.....

It's funny how writing about the things that you do, makes you realise "stuff" about yourself. I am pretty methodical when I approach projects. Sometimes I look at the ordered manner of things in process and think "wow, that girl has control issues!!" Then I remember that "that girl" is me,and put it down to simple efficiency!

When I'm wrapping lots at once, I  keep everything pretty uniform and identical. It's quicker that way. Much as I get a kick out of gift wrapping, I don't have the time or inclination to spend days on it! I'll wrap everything first, then embellish and label them all in one go. (I use trusty post it notes to keep track of who's gift is who's). .Here they are all stacked, labelled and ready.

Next phase will be to add tags and embellishments. I have my handmade tags all ready to go as per the tutorial I posted. I have all my ribbon ready as well. I've just bought some red matt metallic paper that I'm going to try as pleated bands wrapped around each gift. Not sure of the detail yet, or whether it will work out, but that's the plan for tomorrow. Would love to see other peoples wrapping on here!

http://portialawrie.blogspot.com/search/label/Crafty%20Christmas%20Capers

Christmas Aprons - Done!

I finished my Christmas Aprons today. (I posted about them here recently) They're little extras for the Little Tornado's Nan and Great Nan.
I adapted the pattern a little and added the embroidery to personalise. My first attempt at these, so hopefully they'll go down well! More about it over on my blog


Happy Christmas and a happy, healthy & prosperous 2011 to Tilly and all at The Crafty Christmas Club.
Miss P xxx

Perfect Gifts for Fellow Sewists (inc Tutorial)

Today was my last day at college until the new year. I wanted to give my fellow dressmakers a little something. Some time ago, I'd stumbled upon this tutorial on Martha Stewart's fabulous site, and decided they'd be perfect. And they were. Cute AND quick.


I used some of the fabric left from my Christmas aprons, as it's such a pretty floral. I made up the pincushions as per the tutorial, substituting the "leaves" in Martha's version, for pretty vintage buttons on mine, top and bottom. I secured the buttons with the embroidery floss, wrapping the loose end around the thread shank and tucking it undeneath the button to finish it.

I wrapped them in some polka dot cellophane (from my local florist) tied with a white ribbon. If I do say so myself, they looked soooo cute. All done in one evening, whilst relaxing in front of the TV with a glass of Rioja! Thanks Martha! I rather fancy making a giant one of these for myself.....


Happy Christmas all, With Love & Best Wishes, Portia.xxx (Miss P)

Christmas Aprons......

Further progress on my Simplicity 2512 will have to be stalled while I knuckle down to sewing up a couple of little cuties for J's Mum & Nan for Christmas. From my stash I've dug out a lovely chambray for the main fabric and a Cath Kidson floral (which began life as a duvet cover!) for the contrast.

The pattern is Butterick, a collection of 1950's style pinnies that I bought about 2 years ago as a beginner project but never used. The final aprons will be a "fusion" of the styles on the envelope. A half apron, with a wide shaped waistband and ties, with 2 patch pockets, one floral and the other cut from the chambray but emroidered with each of their names.

I didn't like the shape of the waistband piece, so did a little re-shaping of my own. It's testament to what a bit of practice and training can do for your sewing confidence. When I bought this pattern I was too scared to even cut it out, let alone start adapting the design and reshaping the pattern pieces. Hopefully finish these tomorrow....

Super Quick Handmade Gift Tags - Tutorial

I wanted to add a handmade touch to my shop bought wrapping paper,and these are REALLY quick and straight forward to do! I already had everything needed either in my stash, or by making more use of what I had already bought for my wrapping scheme. So not only will they match inperfectly, but they're low cost too.

Once you've assembled all your supplies, you could run a dozen of these up in 15 mins (not kidding, that's all it took). They're so so simple to do, and you can vary the materials to give dramatically different looks. You'll need: wrapping paper, pencil, scissors/craft knife, glue/spray mount, tags/card,buttons, ribbon/cord. (/=or)


First step is to cut your wrapping paper shapes . These can be as simple or as complicated as you like. Being a bit of a slave to a theme though, I decided on geometric Christmas trees. I drew the design out on the back first, layered several scraps of paper and cut them all in one go.


Then glue the shapes to your tags or card. You could add other embellishments. Beads, sparklies, glitter, you name it. Whatever tickles your fancy or ties in with your scheme.


Loop ribbon or cord first through the button, then through the tag, then loop the loose ends of the ribbon through itself behind the button and gently pull tight, until the button sits snug against the tag. Et voila! Simple cute and unassuming.

Christmas Colour Palette

I bought my Christmas wrapping paper weeks ago. I don't tend to use "normal" wrapping paper. Preferring in the past to use poster paper, wallpaper, parcel paper, and florist cellophane to name but a few. I tend to like my wrapping to be a little outside the norm and look handmade. As if it's taken alot of time, thought and effort (which it usually has) if not alot of money (as we're seemingly always short of this!)

However the wrapping paper in question (above) was a mere 99p per 10m roll from Aldi (gotta love Aldi). So my money saving credentials remain intact. I've made my own gift tags to match (tutorial to follow) so my handmade credentials are also intact. Handily, I don't have to spend time agonising over a colour palette. It's all there in the wrapping paper.

A quick trawl through my supplies turned up these metallic red bells left over from last year's wrapping scheme.I incorporated them in my present toppers, so every time someone picked up their present, it would jingle in a festive fashion. Cute. I wired them with tigertail & bead crimps, so they're ready to use. Bit of time saved there, as that was a REALLY fiddly job last year!

I also love these traditional candy canes, so Ill fit these into my scheme too. Probably hanging on the tree ( but not on the door wreath!!). For some reason I'm loving childhood nostalgia even more since The Little Tornado came along.  This year is his second Christmas,and I just know he is going to be sooo excitable come the big day.

I bought the ribbon  from Ebay. (£6.20 inc P&P  for 10m each of Red, Green & Turquoise and 40m of narrow white ribbon. Bargain I think!) I was a little worried about trying to colour match from an online photo but needn't have worried. They match perfectly, and she's a great seller.

I also dug out these china teacups that I've had stashed for a couple of years (yes, I know. My name is Portia, and I am a hoarder.). I think they'll make great festive teacup candles (tutorial here) and will fit beautifully into the scheme. I 've a few other things planned. Mostly with a bit of origami and some papercraft.  Snowflakes, paper chains and the like. And so it begins.......!

Vintage Teacup Candles

The other day I thought I'd have a go at turning my vintage teacups into candles. I've never tried any form of candlemaking before, and was pleasantly suprised by both the finished result, and how easy it was. I can feel a bit of a Christmas production line coming on.........

To begin with pop a pan of water on the hob to boil, place the wax pellets into a metal mixing bowl (you could also use glass) and place the mixing bowl  over the pan of water.  Once the water had started boiling, I turned it down to a simmer and the heat began working it's magic on the wax pellets in the bowl. Within a few minutes, they go from white, to a clear liquid as they melt.

Whilst the wax melts, cut the wick to the required length, dip one end in the molten wax and push it into the little metal "wick retainer". Hold for a few seconds so the wax sets and the wick should now be held pretty securely within the wick retainer. Put a couple of teaspoons of the molten wax in the base of the teacup and push the wick retainer into it. (mind your fingers as the wax is still hot!) The wick should now be "set" into the base of the teacup.

In preparation for pouring the wax into the teacup, the wick needs to be held straight and upright whilst the wax sets.  To achieve this I wedged the wick between two knives, but tying it around a knitting needle would probably work as well. I guess it depends on how much wick you have left to play with and what you find easiest.

Once the wax is melted and ready to pour into the teacup,  you could add some scent or essential oil to the wax to perfume your finished candle. The kit that I had bought had a little bottle of cinnamon scented essence included.  Perfect for Christmas! But I guess you could add most essential oils, (lavender, ylang ylang, patchouli, citrus to name but a few) and tailor it to whatever occasion, mood or preference you like. It is best to add it JUST before you pour the wax into the teacup (give it a qquick stir), since the perfume evaporates whilst it is in contact with the hot wax.  As soon as it is poured and begins to set, it "locks" the perfume in.

It's probably a good idea at this stage to carefully transfer the molten wax to a jug to make it easier to pour (especially if you're as accident prone as I am!). The kit instructions said to fill 3/4 and allow to set for 30mins, then top up with the rest of the wax.
I'll admit I'm impatient and ended up pouring the whole lot in at once, so my finished candle dipped in the middle a bit, with no wax left over to level it.

Click to enlarge
It's then a question of leaving it to set for 24 hours, and it's ready to light, or wrap up and give as a gift (if you can bear to part with it!) You could glue the cup to the saucer to secure it or keep them as two seperate parts. I can't decide, as it feels wrong to put superglue on something so pretty. Overall, I'm pretty chuffed with my first attempt. My imagination is now running away with me, thinking or all the other things I can stick a wick in and fill with wax.............

http://portialawrie.blogspot.com/

Brainstorming

Hello all! I'm back and ready to start sewing gifts. (I'll do another baking post soon though, here is a link to my previous coffee cup tutorial). I'll be sewing/crafting gifts for my Mom, Oma, Aunt E, friend Ashley and boyfriend, as well as making smaller gifts for friends and teachers. I always lean towards the (over) ambitious side, so, I give you a list of possible gifts.

-hand knit scarves and hats
-wristlet/clutch purses
-big purses with matching makeup bag/coin purse
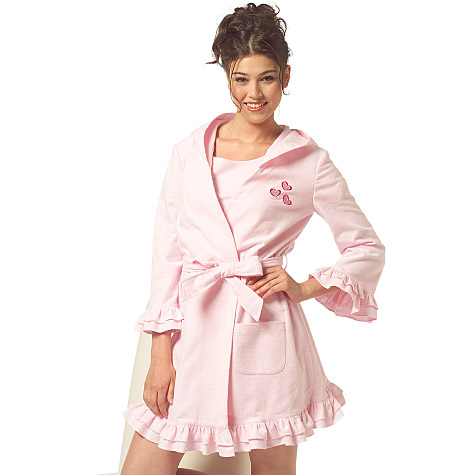
-pajamas and robes
-zip hoodie, either handsewn or refashioned
-loose fitting, season friendly cardigan
-homemade jams and cookies
-photos with handmade frames

I have been browsing patterns, here are a few I like based off gift potential and good reviews on PatternReview.com:


McCall's 5534, for the adorable hooded robe

Simplicity 2560, very simple and cute cardigans. My mom would love view A.


Simplicity 2357, views A and B


McCall's 6089, oversized clutch bags with tassels. This one is high on my list because there is lots of room for embellishment and personalization - both of which are important in a gift!


McCall's 6046, two very stylish bag shapes with embellishment options. 


I've had a lot of success with McCall's bag patterns in the past, namely 5599, so I'm leaning more towards the McCalls bag option than the Simplicity one. Ideally I will find and make one of the purses, decide it's a fabulous pattern, and cut out several more. I'd especially like to make coordinating makeup bags to go inside, so I will have more to fill with lovely fresh cut soaps and products from Lush (I work there, so my opinion is biased, but I get a discount :)

I would love input on fabrics, quick construction, or a hoodie pattern recommendation. Knit scarf or hat pattern suggestions would be lovely as well! 


Holiday Treat Box

Whether you call them biscuits or cookies, they'd sure look cute in a holiday treat box like this one:


They're simple and inexpensive to make. Here's a video tutorial:


I've got a few other ideas for wrapping treats on my blog too, but this is by far my favorite.

A few things started...

I just wanted to update in regards to my giant list....!

Just a heads up with the free bag pattern from Burda: you need to go to verypurpleperson's blog for the instructions. Maybe you guys don't need the instructions but I was a little stumped when I tried it without them!

But they're all done:


And I've finished my prototype make-up case:


Which I gave away as a birthday pressie for my sister in law....

And I've started on my piggy mobile:


If you want the pattern for the piggy mobile (I actually didn't use it but got the inspiration from Welsh Pixie's version) it's in the book Tone Finnanger's book Sew Pretty Christmas Homestyle which I have just bought from Amazon :)

Happy crafting!

A crafty print present idea...

I've just had the morning from hell, which I have blogged about here if anyone's interested in hearing my tale of stupidity! Anyway, to make myself feel better, after work I'm planning to head home via the massive Paperchase on Tottenham Court Road to pick up crafty things and a Secret Santa gift - I've not been before but apparently it's 3 floors of stationery goodness! Love Paperchase. I'm then going to play about with my Scrabble picture Christmas present idea, drink wine and watch The Apprentice.

The Scrabble picture is something I thought of the other day. This is one of my preliminary shots:

taken using the Hipstamatic app for iPhone to get the retro feel

Cute isn't it? I think so anyway. It's for my wee sister (who is called Laura, funnily enough). I am still not sure what to do with it. My ideas so far are:

  • leave as is, put in a simple but nice frame
  • add in something else to the bottom left corner - maybe a snapshot of her?
  • put in a box frame so I can put actual objects in front of the print

I have a tendency to over-work things so any feedback or even any BETTER ideas would be appreciated! What should I do with it??

Yuletide offerings

Greetings fellow crafty ones and thank you Tilly for starting this excellent blog up!  Im Molly from Molly and Mango and crafting it up this year for yule will be going via the home baked goodies route!


 A couple of years ago, I sent round Rich Fruit Cakes wrapped in festively red muslin cloth, which were immensely successful (although I had trouble convincing a few people I had really made them!) so when the Molly-Porn arrived last month (aka the Lakeland Catalogue), I was inspired by their several pages of homemade christmas cookies and chocolates to do festive cookies for family and friends. I especially like the idea of these jewel trinket biscuits:


They featured a lot of great shaped cutter sets and silicone cases but when I went to one of their stores to buy, none of what I wanted was in stock yet, boohoo Lakeland. (That said I picked up 30 poinsetta cellophane gift bags for £2.50)  So a good friend tipped me off about TK Maxx and I found not only did they have a massive range of christmas cookie cutters but they were a fraction of the price of Lakeland. Last week I found a version of Lakeland's star tree cookers in Tiger (the latest Scandinavian high street import) for just £1.

And the luck didn't stop there... I love the traditional Gingerbread house and this time of year, kits are everywhere, but I wanted to build them from scratch so I dismissed those.  Then I found two great kits at TK Maxx containing just cutters which seemed like a great way to speed up the process and so this year's treats for the specials will be Gingerbread Houses after all (and filled with cookies!).  I'm about to start testing out recipes, so if anyone has any recommendations, I would love to hear them.

And if you want to make your own Gingerbread House, check out this amazing blog, Sweetopia, to get your creativity flowing.  I came across this site while looking for inspiration for icing my cookies, and when the royal icing tutorial featured owl cookies foremost, I knew I'd found the place!  Who could resist these details:

      details

More on the gingerbread houses here.

Looking forward to sharing pics with you and seeing what you have all been making!  All the happiness of the season to you and yours.