Showing posts with label bags. Show all posts

Pressies for the in-laws


Now that Christmas is over I can finally share the last presents with you. I would also like to take this opportunity to invite you all over to Grey Duckling to take part in my first ever giveaway. In the autumn I made a few bobbin lace flower brooches and I am giving one of them away as an extra New Years present to one lucky person. You just have to comment on the post on Grey Duckling to take part in the giveaway.

I hope you all had a great Christmas and I wish you all a crafty New Year.
Eddie


Bunch of knitted flowers for my sister-in-law made using Ingrid's recipe for knitted flowers on Historic Crafts.


Novel bag for my sister-in-law using this tutorial from Grey Duckling that I adapted from the book 'playing with books'!


Decoupaged drawing onto the bottom of a bowl for my sister-in-law


Basketweave scarf for my father-in-law using this pattern that I talked about on 'Roued is...'.
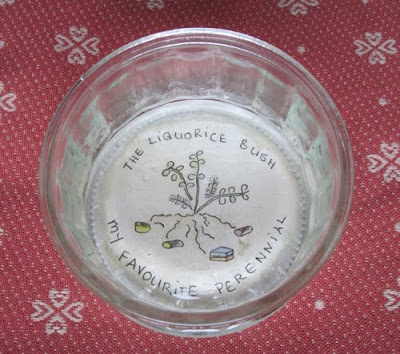

Another decoupage bowl!


Mug cozy for my mother-in-law made with the Dixie Norton's pattern on Ravelry.


Garden markers for my mother-in-law. I have posted a tutorial on Grey Duckling on how to make these.

The Curvy Clutch goes glam!

Hello everyone! I'm a bit of a late arrival to posting on this blog, but better late than never (and it's still before Christmas!). My name is Suzie and I blog over at Su Sews So-So, do pop over sometime and say hi - I love hearing from everyone.

I had actually decided not to make anything handmade as presents this Christmas after a rather upsetting experience of spending lots of time and money on a present for a friend that was quite obviously not appreciated. I had blogged all about it at the time, but have since deleted the post as I didn't like having such a negative post up on my blog! Plus, I've had my faith restored in humanity (lol, a little over dramatic perhaps?!) and I decided that I would try again at giving handmade.

My group of friends opt to do Secret Santa for presents - if you haven't heard of this concept before you basically put all the names of your group in a hat and the name you pull out is who you buy a present for. You also tend to sent a limit to spend, so that everyone spends the same amount. It's a great way to save money and time and it means you are more likely to get one 'big' present that you (hopefully!) like rather than lots of little small things that might just be 'crap' (!!).

This year I got my lovely friend Meliosa (pronounced Mel-Lisa, it's Irish) and I knew she would be the perfect person to make a Curvy Clutch for. I had previously made the Curvy Clutch for myself (pattern here) out of red and black Ikea fabric and it really was quite a hit with everyone, especially her - so I thought she deserved her own version!

I found a beautiful red dupion reduced to a bargain £4 a meter so I snapped that up and paired it with a gorgeous gold print my mum had given me and made up the bag. I was very happy with the finished result, but I felt it lacked a little something. So after a scout around the shops I decided to add a flower hair-clip to the lid, and it really transforms the bag into something quite glamorous!


I took the finished bag to my mums to show her and she promptly produced a gorgeous pair of newly purchased red heels which she plans to wear out for NYE...and didn't have a bag for..... Now what on earth could she have been getting at?! So, the good daughter that I am, I suggested she keep this bag and I make another one for my friend.

So back to the sewing machine I went! To be honest, I had been having reservations about the gold lining as I remembered that Meliosa never wears gold jewellery, so it turned out for the best that I could make another one in more suitable colours. So she will be getting this:


This is a gun-metal dupion shell with a satin dupion royal purple lining. The photo's don't quite do the colours justice unfortunately.

I hope she likes it!


Thanks for letting me post here, it's been great fun seeing what everyone has been making - what a great idea Tilly! Wishing you all a very Happy Christmas and a very crafty 2011!!!

Scrap Buster: Gift Pockets!


Want to make something cute with those holiday fabric scraps?  Make a little gift pocket that you can hang on your tree to hold money, candy, or miniature ornaments:

These are easy, quick, and fun to make.  Get the details at Serendipity Handmade blog.

More Buttercup bags!


Following the success (if I do say so myself) of the Buttercup bag I made the other day, I decided to make some more for my mum, boyfriend's mum, and friend from work. I made them production line stylee to save time and head scratching between steps.


As I discovered last time I made this, the Buttercup pattern turns out a very small handbag (10" across), so I decided to adapt it into a zippered make up bag pattern instead. I added a little extra height and flat tops to pieces A+ C, and followed Flossie Teacakes' extremely clear instructions for covering zip ends and sewing zip and fabric layers in the right configuration.


This one is made from the Liberty reproduction of an 18th century print that I bought from the V&A Quilts exhibition.


This one is a Tanya Whelan print, correctly identified by Jane as the leftover fabric from my Sencha blouse (a blouse I have never worn, BTW - the fabric is much better suited to bags!).


This one is from a tiny piece of one of my favourite fabrics ever, with a darling vintage beauty product print.


And this is what my street looked like while I was busy stitching in the warmth!

Love from Tilly x

Buttercup bag


I made this handbag for my sister in law today. She loves Cath Kidston so hopefully this fabric (by Tanya Whelan) will be up her street! I used Rae's Buttercup Bag pattern, which is so easy if anyone is thinking of whipping up something similar. I'm not sure if you can see in the photo but the front is pleated, which looks fairly impressive for something that's really simple to make.


I used a coral slub weave for the lining (I know it looks fluorescent pink in the photo, but it's coral, honest!) and added fabric covered buttons to join the strap to the sides.

The bag is really very small - only 10" across - so I'm going to make a couple more of these as make up bags, with a zip at the top and no strap.

Love from Tilly x

Screenprinted Seed Bags

I mentioned in an earlier post that my theme for Christmas gifts this year (for my family) is Garden. I find it easier to buy gifts when shopping from a theme, as it narrows down your search rather than having an overwhelming amount of choices. In past years I have themed my gift shopping 'food', 'books' and a whole range of other things.

As part of my gift for a few people I am giving some packets of organic and heirloom seeds. I thought I would make some cute seed bags to give them in.


I started by sketching some simple fruit designs that will be screenprinted onto simple calico drawstring bags (feel free to copy these designs - they are pretty basic to draw).


I then transferred the designs onto screenprinting paper, and cut them out. Because I wanted to print the main part of the fruit in red, and the tops in green, I covered the cut out part of the tops in sticky tape so that I could start with the red fabric paint.


Then I screenprinted the designs onto the cut out (but not yet sewn) calico bags. Do remember to put a sheet of paper underneath your layer of fabric, because I forgot on my first one and the fabric paint bled through underneath :(

I screenprinted the cheaters way (i.e. with a paint brush, rather than a squeegie), I find this easier for small prints. I let the red paint dry, then untaped the tops and taped up the red part of the fruits, and continued to screenprint the green sections.


From here on in it was all pretty easy - stitch up the sides, then fold down the tops twice (towards you, with the right side facing you) and stitch, leaving a little space to thread some ribbon.


Almost done! Now just to finish off the ends and thread through some red ribbon...


et voila! Some cute bags to keep your seeds in!

Only a fortnight until Christmas now... can Stitchybritt get all the gifts (some I haven't started making) finished and wrapped by Christmas day?

Peg Bags!

Hi, I'm Tabatha from Thread Carefully and this year I've made a few people peg bags for Christmas. They are really quick and easy to make, and they're a good thing to give to the person who seems to have everything, or to someone you have no idea what else they might like.

Here's how I made mine. You will need 1/2 metre of fabric, bias binding to match, thread and a child-size hanger (by this I mean a hanger for children's clothing, not a hanger the size of a child!).

Step One - Cut two rectangular pieces of fabric, about 18"x14" (approx. 45cm x 35cm). Place your hanger at the top and draw along its edge. Cut along the line. (Tip: I overlocked the very top edge of each piece of fabric too, because you have to leave a gap for the hanger to go through, and I wanted to finish the raw edge, even though it ends up being tucked in). At the bottom, cut the corners into a curve. You should end up with two identical pieces of fabric looking like this:


Step Two - Take one of the pieces of fabric, and about a third of the way down from the top, draw and then cut the peg bag opening. It should measure at least 7", so that you can get the hanger in at the end.


Step Three - Use the bias binding to bind the raw edges of the fabric at the peg bag opening. I used ribbon because I couldn't find bias binding in a complementary colour, and I didn't have enough fabric to make my own. I pressed my ribbon in half lengthways (as you would also do with bias binding), and stitched it over the raw edges:


Step Four - Lay your front piece and back piece right sides together, and stitch together, remembering to leave a gap at the top where the hanger will go through.


Step Five - Clip the curved edges.


Step Six - Turn inside out, through the peg bag opening. Insert your hanger, and you're done! If you like, you can now add some decorative ric-rac, buttons, embroidery, applique...whatever takes your fancy! The peg bag I've shown here is for my grandfather-in-law, so I'm leaving it plain!

Gifts for the book lover

I am a great book lover and I know many book lovers. This is why I decided to make some of these fun bags for the book lovers in my life. For more ideas check out my Pinterest board.


This book bag can be a bit difficult to figure out so here is a couple of other tutorials I found for you:

More ideas for the book lover
Some of my other gift tutorials on Grey Duckling
  1. Gifts for the Gardener
  2. Gifts for the Musician
  3. Gifts for the Seamstress
  4. Gifts for the Navigator
  5. Gifts for Advent Calender
  6. Gifts for the Book Lover